반응형
EKS
EKS의 마스터 노드는 AWS에서 관장을 한다.
사용자가 원하는 상태(Desired State)로 동작하고 관리(Schedule)하는 것
=> EKS, ECS
- EKS는 파드로 관리
- ECS는 컨테이너로 관리
컨테이너 엔진인 docker는 쿠버네티스 처럼 자동 deploy를 할 수 없다.
그래서 사용하는 것이 ECS.
EKS는 crio라는 컨테이너 엔진이 설치되어있다.

- API Server
- etcd
- cloud-controller-manager
- scheduler
EKS 구성 시 IAM Role 구성
- 역할 생성


- 권한명
eks-clusterRole의 권한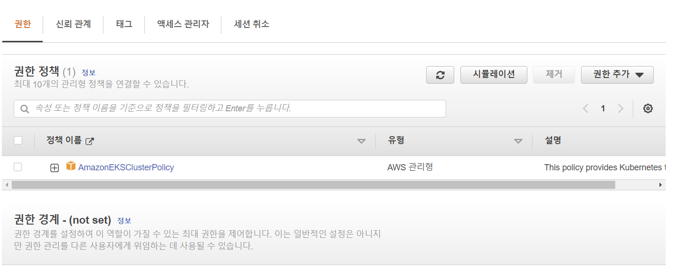
eks-workModeRole의 권한
eksctl 명령을 이용하여 AWS EKS 생성하기
1. ubuntu Linux EC2 호스트 준비
AWS EC2 instance를 생성해서 k8s managed Server로 사용
우선 먼저 AWS EC2 Ubuntu Linux 를 하나 만들자
2. ubuntu Linux EC2 에 AWS CLI 관리툴인 aws
참고: https://docs.aws.amazon.com/ko_kr/cli/latest/userguide/install-cliv2-linux.html
$ sudo apt-get install -y unzip
$ curl "https://awscli.amazonaws.com/awscli-exe-linux-x86_64.zip" -o "awscliv2.zip"
$ unzip awscliv2.zip
$ sudo ./aws/install
You can now run: /usr/local/bin/
$ aws --version
aws-cli/2.7.11 Python/3.9.11 Linux/5.13.0-1029-aws exe/x86_64.ubuntu.20 prompt/off
3. ubuntu Linux EC2 에 EKS설치/운영 툴인 eksctl 설치
참고: https://docs.aws.amazon.com/ko_kr/eks/latest/userguide/eksctl.html
$ curl --silent --location "https://github.com/weaveworks/eksctl/releases/latest/download/eksctl_$(uname -s)_amd64.tar.gz" | tar xz -C /tmp
$ sudo mv /tmp/eksctl /usr/local/bin
$ eksctl version
0.143.0
4. ubuntu Linux EC2 에 k8s 관리툴인 kubectl 설치
참고: https://docs.aws.amazon.com/ko_kr/eks/latest/userguide/install-kubectl.html
$ curl -o kubectl https://amazon-eks.s3.us-west-2.amazonaws.com/1.21.2/2021-07-05/bin/linux/amd64/kubectl
$ chmod +x ./kubectl
$ mkdir -p $HOME/bin && cp ./kubectl $HOME/bin/kubectl && export PATH=$PATH:$HOME/bin
$ echo 'export PATH=$PATH:$HOME/bin' >> ~/.bashrc
$ kubectl version --short --client
Client Version: v1.21.2-13+d2965f0db10712
5. ubuntu Linux EC2 에서 aws 관리할수 있도록 root 계정으로 로그인 하기
$ aws configure
AWS Access Key ID [None]: AKIASJ...E37V
AWS Secret Access Key [None]: XLzhAqt...7g
Default region name [None]: ap-northeast-2
Default output format [None]: <ENTER>
$ cat .aws/config
[default]
region = ap-northeast-2
$ cat .aws/credentials
[default]
aws_access_key_id = AKIASJ...E37V
aws_secret_access_key = XLzhAq...7g
잘 연결되는지 확인
$ aws sts get-caller-identity
{
"UserId": "595362810845",
"Account": "595362810845",
"Arn": "arn:aws:iam::595362810845:root"
}
6. EKS 구성
참고: https://docs.aws.amazon.com/ko_kr/eks/latest/userguide/getting-started-eksctl.html
===============================================================
1. First, create cluster.yaml file: vi cluster.yaml 빈 yaml 파일을 생성한다. 단 여러분의 환경에 맞도록 subnet 을 수정한다.
2. 아래 yaml 파일을 복사하여 붙여 놓는다.
3. eksctl create cluster -f cluster.yaml 실행한다.
4. eksctl delete cluster -f cluster.yaml 삭제한다.
===============================================================
apiVersion: eksctl.io/v1alpha5
kind: ClusterConfig
metadata:
name: vec-powermvp
region: ap-northeast-2
vpc:
subnets:
private:
ap-northeast-2a: { id: 자신의 프라이빗 서브넷(ex subnet-0db1b741a01dd8ef7) }
ap-northeast-2c: { id: 자신의 프라이빗 서브넷(ex subnet-081eb347d8fe2f523) }
nodeGroups:
- name: VEC-PRD-NG-worker1
labels: { role: workers }
instanceType: t3.medium
desiredCapacity: 1
privateNetworking: true
subnets:
- 자신의 프라이빗 서브넷(ex subnet-081eb347d8fe2f523)
- name: VEC-PRD-NG-worker2
labels: { role: workers }
instanceType: t3.medium
desiredCapacity: 1
privateNetworking: true
subnets:
- 자신의 프라이빗 서브넷(ex subnet-0db1b741a01dd8ef7)
iam:
withAddonPolicies:
imageBuilder: true
====================================================================================
CloudFormation으로 생성되기 때문에 aws에서 cloudformation으로 확인해본다.
생성되는 시간이 20분정도 걸린다.
...
2021-05-19 06:04:39 [ℹ] eksctl version 0.50.0
2021-05-19 06:04:39 [ℹ] using region ap-northeast-2
2021-05-19 06:04:39 [ℹ] setting availability zones to [ap-northeast-2a ap-northeast-2b ap-northeast-2c]
2021-05-19 06:04:39 [ℹ] subnets for ap-northeast-2a - public:192.168.0.0/19 private:192.168.96.0/19
2021-05-19 06:04:39 [ℹ] subnets for ap-northeast-2b - public:192.168.32.0/19 private:192.168.128.0/19
2021-05-19 06:04:39 [ℹ] subnets for ap-northeast-2c - public:192.168.64.0/19 private:192.168.160.0/19
2021-05-19 06:04:39 [ℹ] using EC2 key pair %!q(*string=<nil>)
2021-05-19 06:04:39 [ℹ] using Kubernetes version 1.19
2021-05-19 06:04:39 [ℹ] creating EKS cluster "k8s-demo" in "ap-northeast-2" region with managed nodes
2021-05-19 06:04:39 [ℹ] will create 2 separate CloudFormation stacks for cluster itself and the initial managed nodegroup
2021-05-19 06:04:39 [ℹ] if you encounter any issues, check CloudFormation console or try 'eksctl utils describe-stacks --region=ap-northeast-2 --cluster=k8s-demo'
2021-05-19 06:04:39 [ℹ] CloudWatch logging will not be enabled for cluster "k8s-demo" in "ap-northeast-2"
2021-05-19 06:04:39 [ℹ] you can enable it with 'eksctl utils update-cluster-logging --enable-types={SPECIFY-YOUR-LOG-TYPES-HERE (e.g. all)} --region=ap-northeast-2 --cluster=k8s-demo'
...
2021-05-19 07:09:28 [✔] saved kubeconfig as "/home/ubuntu/.kube/config"
2021-05-19 07:09:28 [ℹ] no tasks
2021-05-19 07:09:28 [✔] all EKS cluster resources for "k8s-demo" have been created
2021-05-19 07:09:29 [ℹ] nodegroup "ng-343b6807" has 3 node(s)
2021-05-19 07:09:29 [ℹ] node "ip-192-168-38-198.ap-northeast-2.compute.internal" is ready
2021-05-19 07:09:29 [ℹ] node "ip-192-168-4-22.ap-northeast-2.compute.internal" is ready
2021-05-19 07:09:29 [ℹ] node "ip-192-168-82-229.ap-northeast-2.compute.internal" is ready
2021-05-19 07:09:29 [ℹ] waiting for at least 3 node(s) to become ready in "ng-343b6807"
2021-05-19 07:09:29 [ℹ] nodegroup "ng-343b6807" has 3 node(s)
2021-05-19 07:09:29 [ℹ] node "ip-192-168-38-198.ap-northeast-2.compute.internal" is ready
2021-05-19 07:09:29 [ℹ] node "ip-192-168-4-22.ap-northeast-2.compute.internal" is ready
2021-05-19 07:09:29 [ℹ] node "ip-192-168-82-229.ap-northeast-2.compute.internal" is ready
2021-05-19 07:09:32 [ℹ] kubectl command should work with "/home/ubuntu/.kube/config", try 'kubectl get nodes'
2021-05-19 07:09:32 [✔] EKS cluster "k8s-demo" in "ap-northeast-2" region is ready
- aws에서 확인 : CloudFormation 검색 후 확인
7. 설치완료되면 다음과 같이 설치 결과 확인하고, CLI 명령어 자동완성 기능을 추가
- kubectl 명령으로 설치결과 확인
$ kubectl get nodes
NAME STATUS ROLES AGE VERSION
ip-192-168-38-198.ap-northeast-2.compute.internal Ready <none> 28m v1.19.6-eks-49a6c0
ip-192-168-4-22.ap-northeast-2.compute.internal Ready <none> 28m v1.19.6-eks-49a6c0
ip-192-168-82-229.ap-northeast-2.compute.internal Ready <none> 28m v1.19.6-eks-49a6c0
CLI 명령어 완성기능 추가
$ source <(kubectl completion bash)
$ echo "source <(kubectl completion bash)" >> ~/.bashrc
8. 간단한 실행 실습
워커 노드 정보 보기
$ kubectl get nodes -o wide
Pod 배포 TEST. nginx 컨테이너 5개 실행하고 결과 확인
$ kubectl create deployment webtest --image=nginx:1.14 --port=80 --replicas=5
$ kubectl get pods -o wide
NAME READY STATUS RESTARTS AGE IP NODE NOMINATED NODE READINESS GATES
webtest-fdf54587f-8mfrz 1/1 Running 0 28s 192.168.10.139 ip-192-168-2-91.ap-northeast-2.compute.internal <none> <none>
webtest-fdf54587f-d4pjc 1/1 Running 0 28s 192.168.39.104 ip-192-168-56-22.ap-northeast-2.compute.internal <none> <none>
webtest-fdf54587f-dqg55 1/1 Running 0 28s 192.168.13.27 ip-192-168-2-91.ap-northeast-2.compute.internal <none> <none>
webtest-fdf54587f-hs8zd 1/1 Running 0 28s 192.168.77.185 ip-192-168-70-30.ap-northeast-2.compute.internal <none> <none>
webtest-fdf54587f-pn549 1/1 Running 0 28s 192.168.83.249 ip-192-168-70-30.ap-northeast-2.compute.internal <none> <none>
nginx 웹서버에 클라이언트 접속 가능하도록 구성하고 간단히 TEST
$ kubectl expose deployment webtest --port=80 --type=LoadBalancer
$ kubectl get services
NAME TYPE CLUSTER-IP EXTERNAL-IP PORT(S) AGE
kubernetes ClusterIP 10.100.0.1 <none> 443/TCP 33h
webtest LoadBalancer 10.100.222.89 ab5190278c9ac491cb45a4bc42a6d689-1608401336.ap-northeast-2.elb.amazonaws.com 80:30331/TCP 31s
1분정도 후에 웹브라우저를 통해 웹서버 연결되는지 확인 (nginx 홈페이지가 떠야 한다.)
http://ab5190278c9ac491cb45a4bc42a6d689-1608401336.ap-northeast-2.elb.amazonaws.com
9. 모든 실습이 끝났고, 더이상 EKS 사용하지 않는다면 아래 명령으로 삭제. 삭제하지 않고 두면???? 음.. 나중에 깜딱 놀랄수도 있어요~ EKS, EC2 모두 과금됩니다.
$ eksctl delete cluster --name vec-powermvp
2021-05-21 18:39:08 [ℹ] eksctl version 0.50.0
2021-05-21 18:39:08 [ℹ] using region ap-northeast-2
2021-05-21 18:39:08 [ℹ] deleting EKS cluster "k8s-demo"
2021-05-21 18:39:08 [ℹ] deleted 0 Fargate profile(s)
2021-05-21 18:39:09 [✔] kubeconfig has been updated
2021-05-21 18:39:09 [ℹ] cleaning up AWS load balancers created by Kubernetes objects of Kind Service or Ingress
...
2021-05-21 18:42:37 [ℹ] waiting for CloudFormation stack "eksctl-k8s-demo-addon-iamserviceaccount-kube-system-aws-node"
2021-05-21 18:42:55 [ℹ] waiting for CloudFormation stack "eksctl-k8s-demo-addon-iamserviceaccount-kube-system-aws-node"
2021-05-21 18:42:55 [ℹ] deleted serviceaccount "kube-system/aws-node"
2021-05-21 18:42:56 [ℹ] will delete stack "eksctl-k8s-demo-cluster"
2021-05-21 18:42:56 [✔] all cluster resources were deleted
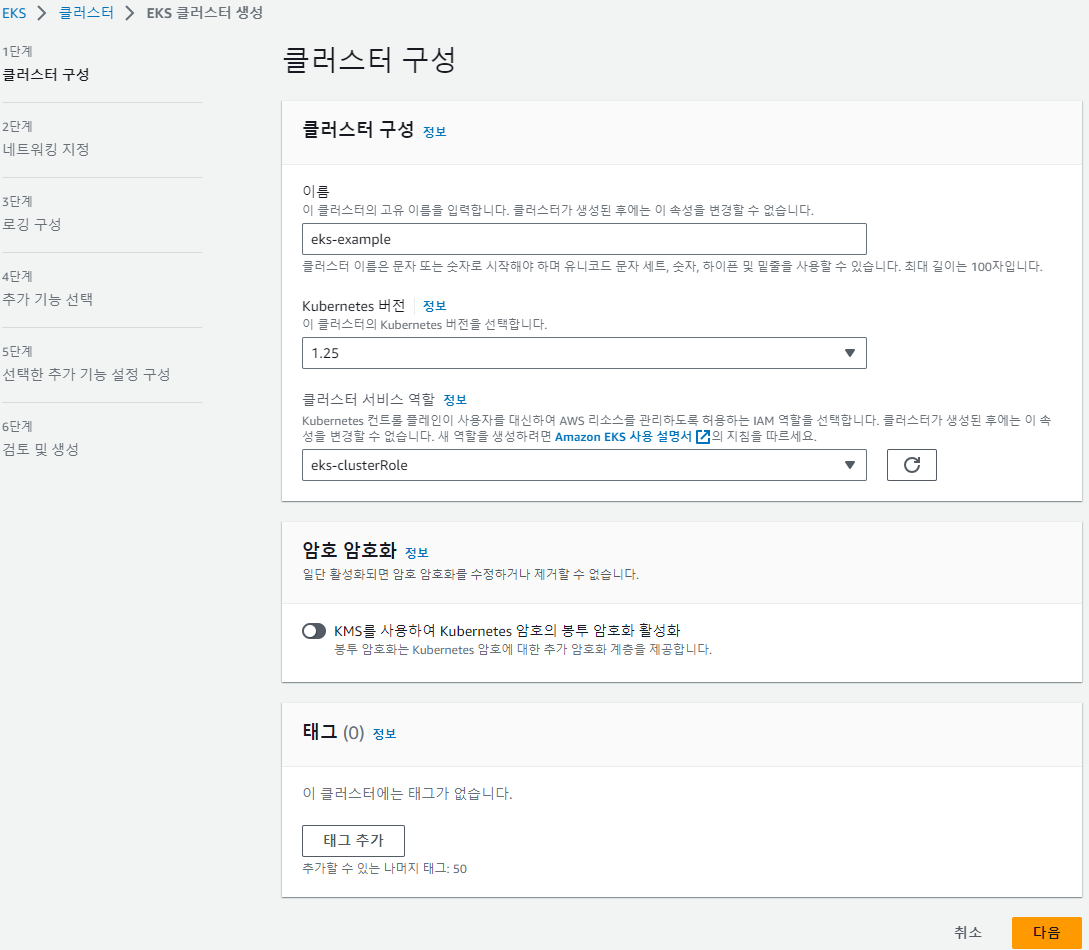
지우는 시간도 오래 걸려요~AWS 콘솔에서 EKS 생성
EKS 클러스터 생성

클러스터 서비스 역할을 미리 만들어 두어야 한다.
현장에서는 프라이빗 서브넷에서만 생성한다.
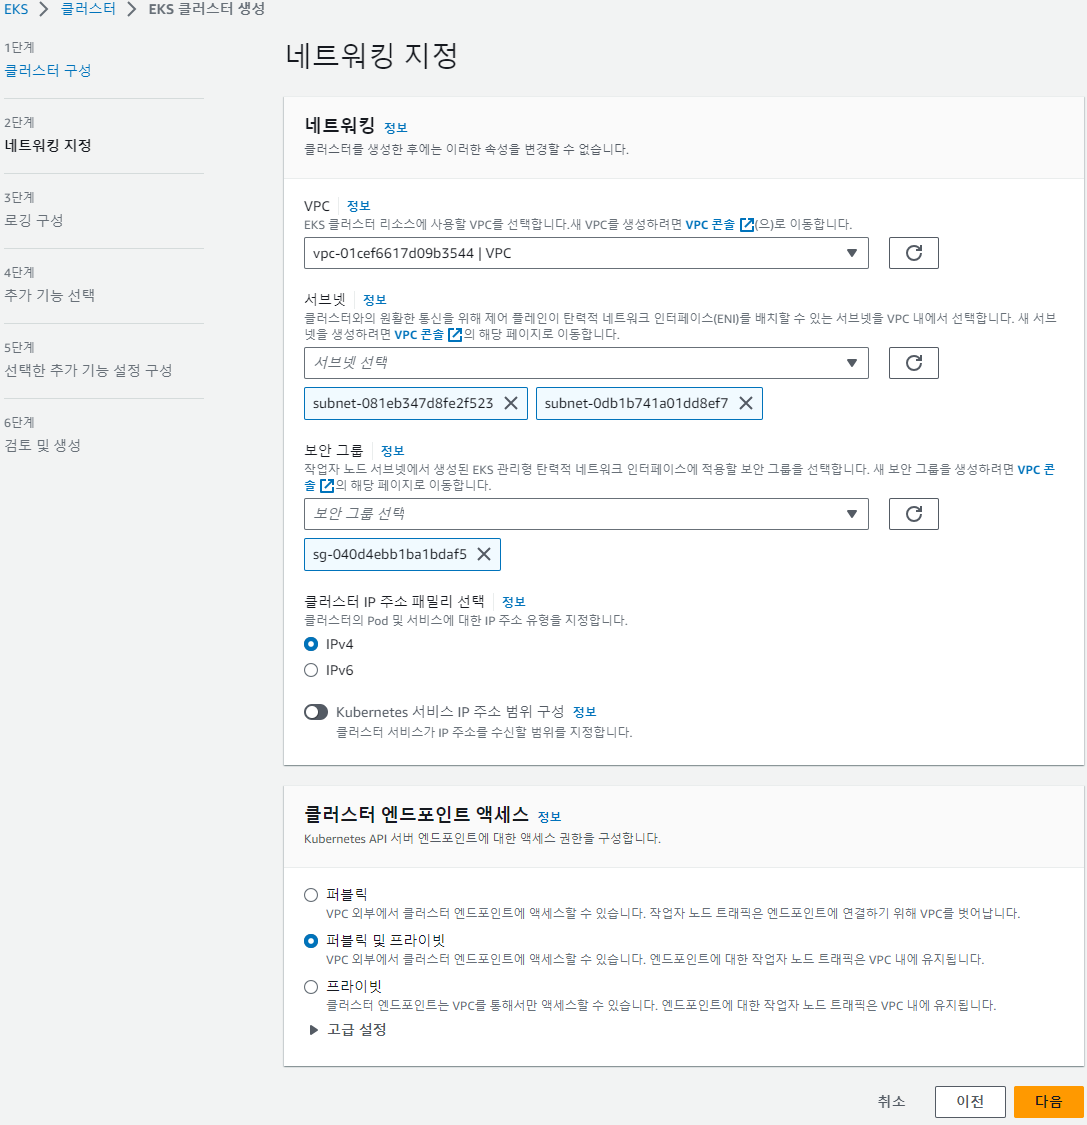
이렇게 생성을하고 뒤에 항목들은 다음만 계속 누르면 EKS 클러스터가 생성이 된다.
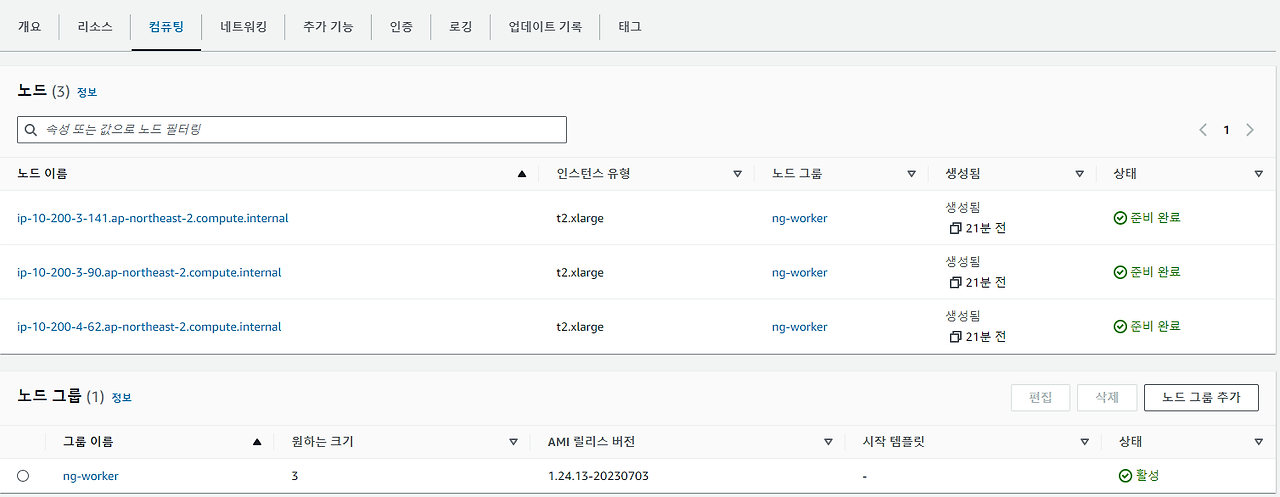
EKS 클러스터에서 노드 생성

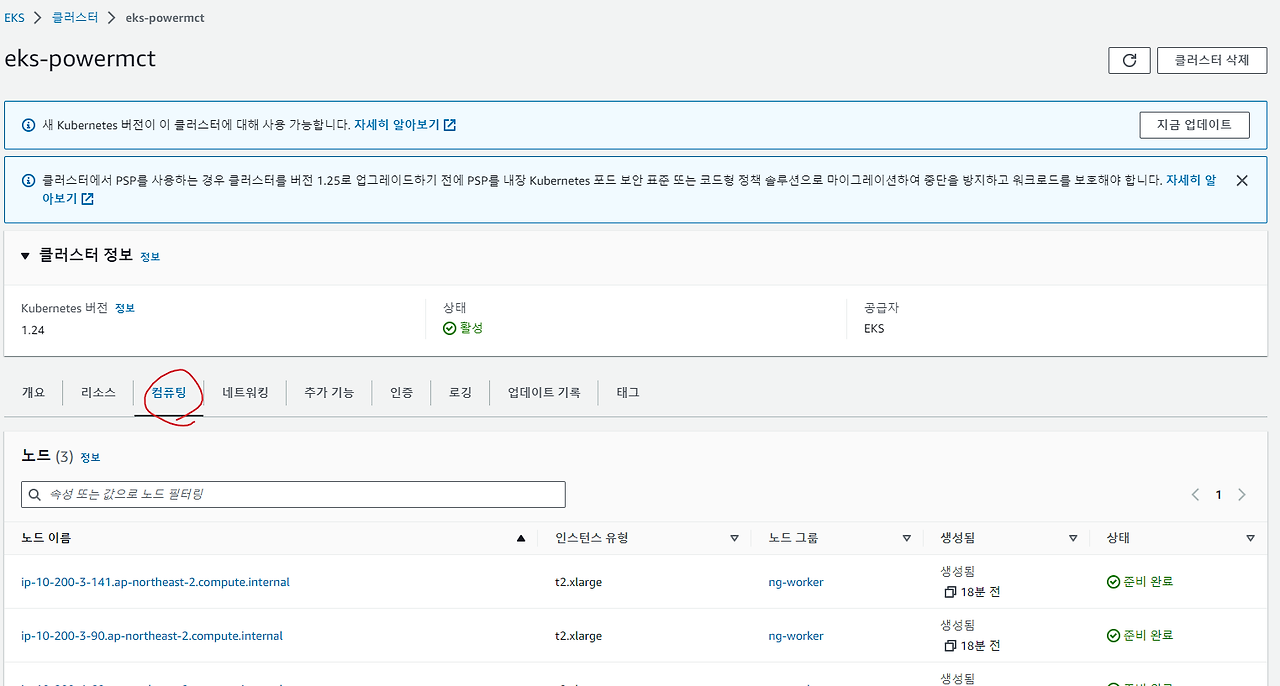

노드 IAM 역할도 미리 정해 주어야 한다.

노드 그룹 조정 구성 = 오토스케일링

노드에 대한 원격 엑세스를 허용 해주면 외부에서도 노드에 접근 할 수 있다.

그 후 노드가 생성이 되면 CLI를 통해 다른 곳에서 접근 할 수 있다.(물론 aws cli 접속이 되어야함)
aws eks --region ap-northeast-2 update-kubeconfig --name (k8s-powermvp)
=> 콘솔에서 만든 클러스터인 k8s-powermvp로 cli에서 접근 하는 명령어
반응형
'AWS' 카테고리의 다른 글
| EKS에 외부 클러스터 등록 (0) | 2024.03.17 |
|---|---|
| ECS fargate 구성해보기 (0) | 2024.02.03 |
| 온프레미스 DB를 AWS 에 복제 하기 (0) | 2024.01.30 |
| VPN을 사용하여 집 공유기와 AWS 연결 (untangle) (0) | 2024.01.24 |
| AWS - (Nginx, Tomcat, 로드밸런서 사용해보기) (2) | 2024.01.22 |